Setup IKEA VINDRIKTNING + WeMos D1 mini (Tasmota Firmware)

IKEA VINDRIKTNING + WeMos D1 mini (Tasmota Firmware)

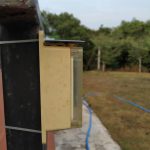
IoT 101 ของเรา วันนี้ จะมาพูดถึงวิธีการ Setup IKEA VINDRIKTNING + WeMos D1 mini (Tasmota Firmware) กันครับ
โดยมีขั้นตอนต่างๆ ประมาณนี้

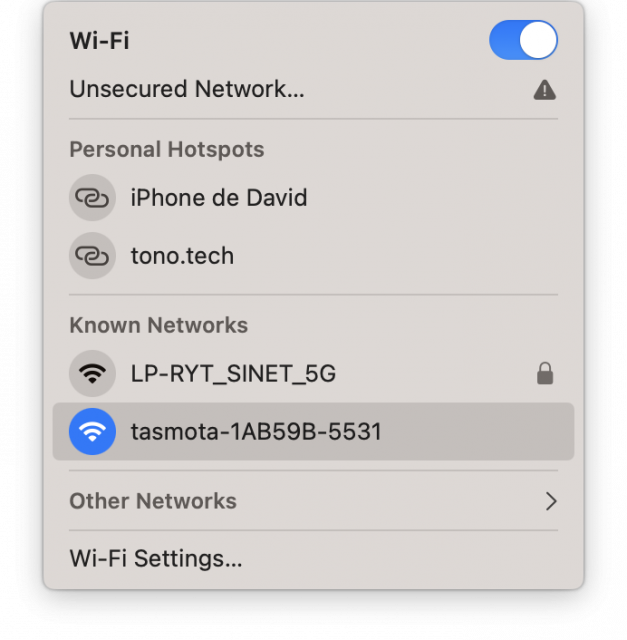
1. เกาะ WiFi (AP): tasmota-XXXXXX-XXXX

2. เปิด Web Browser เข้า http://192.168.4.1

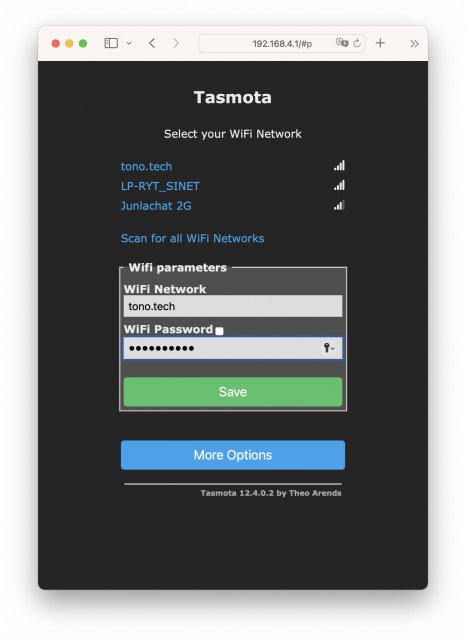
3. ทำการ Setup WiFi ที่ต้องการใช้งาน

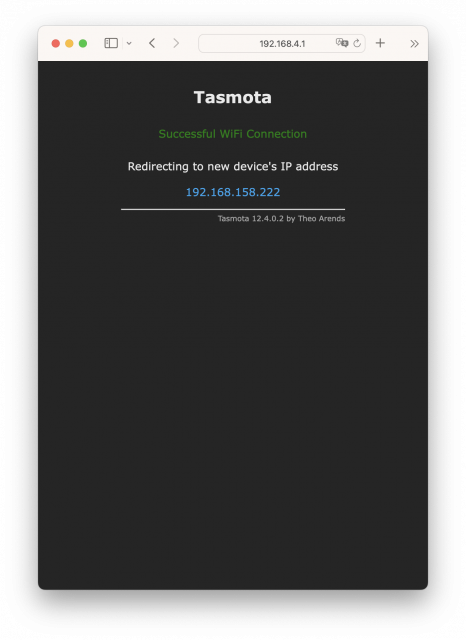
4. จากนั้นเข้าผ่าน IP ใหม่ ของ Tasmota ที่ได้จาก WiFi ที่คุณใช้งาน

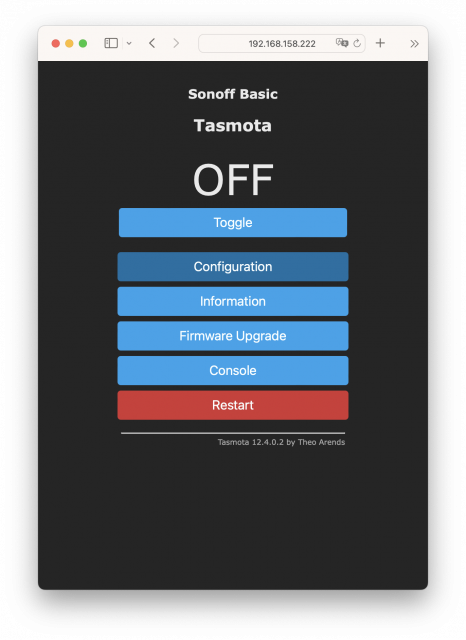
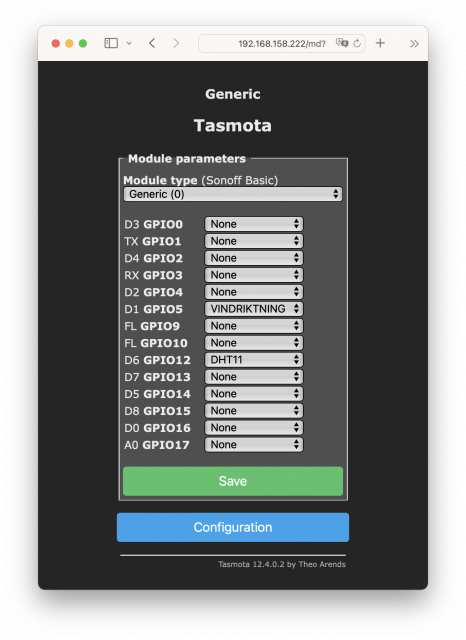
5. คลิก Configuration > Configure Module เลือก Generic (0) กด Save แล้วรอ Tasmota Restart

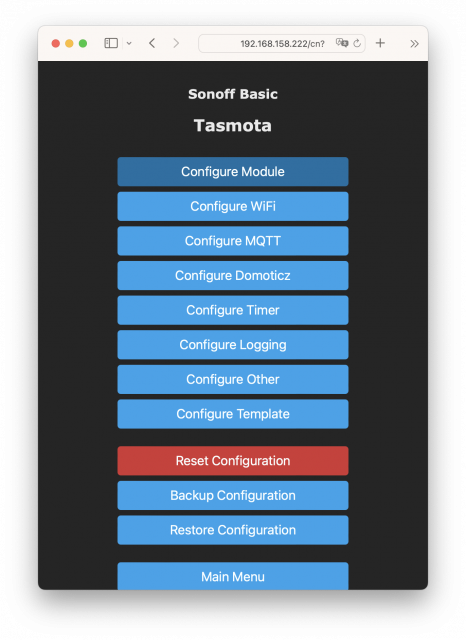
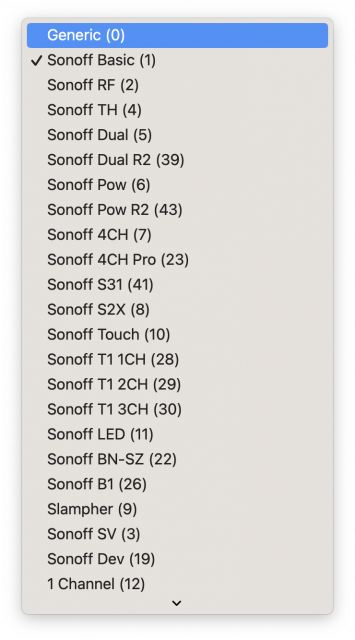
6. คลิกเข้า Configure Module อีกครั้ง
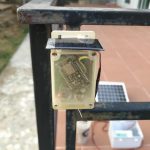
– PIN: D1 GPIO5 เลือก VINDRIKTNING
– PIN: D6 GPIO12 เลือก DHT11
กด Save แล้วรอ Tasmota Restart

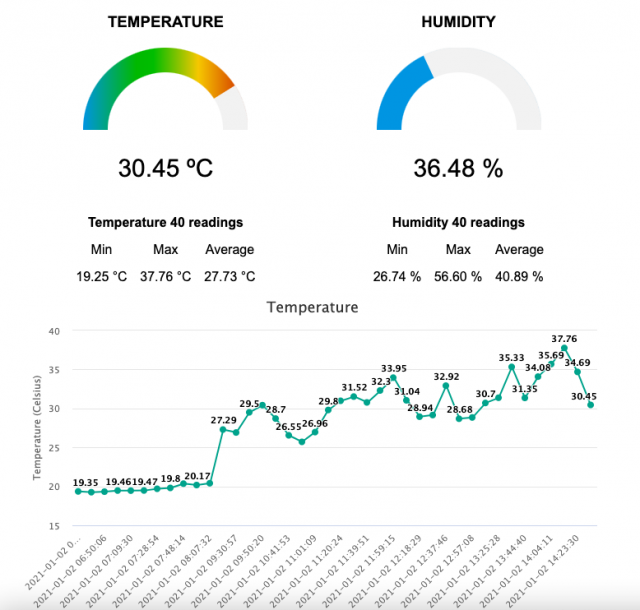
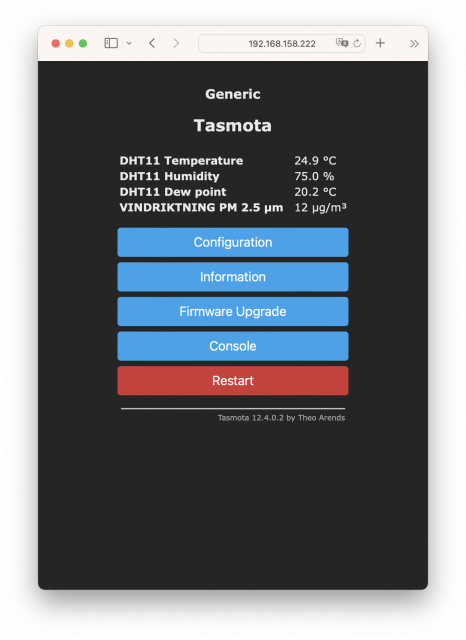
7. เมื่อเรา config ถูกต้อง ก็จะได้ค่า Temperature, Humidity, Dew point และ PM 2.5 ตามรูปครับ

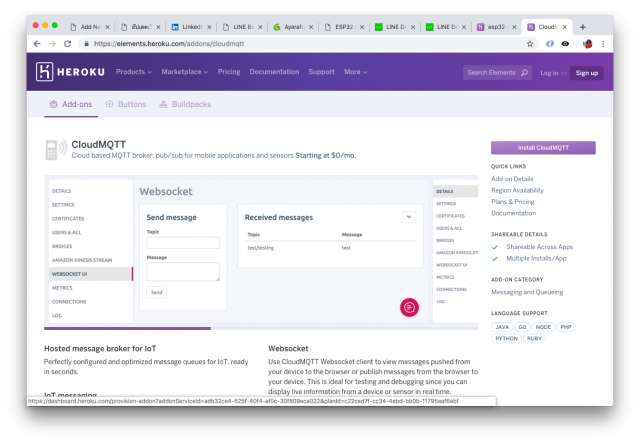
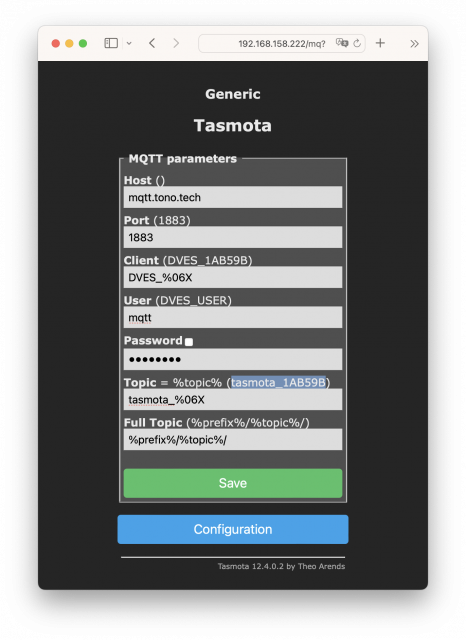
8. คลิก Configuration > Configure MQTT
– Host: mqtt.tono.tech
– Port: 1883
– Client: DVES_%06X (ค่า default)
– User: mqtt
– Password: XXXXXX
– Topic: tasmota_%06X (ค่า default)
* จากตัวอย่าง จะได้ค่า tasmota_1AB59B ตามเลข MAC Address ของตัว ESP8266
– Full Topic: %prefix%/%topic%/ (ค่า default)
กด Save แล้วรอ Tasmota Restart

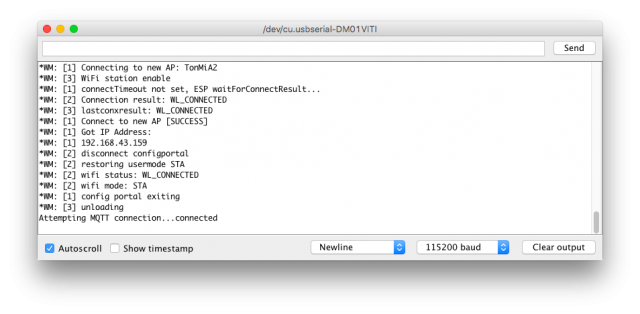
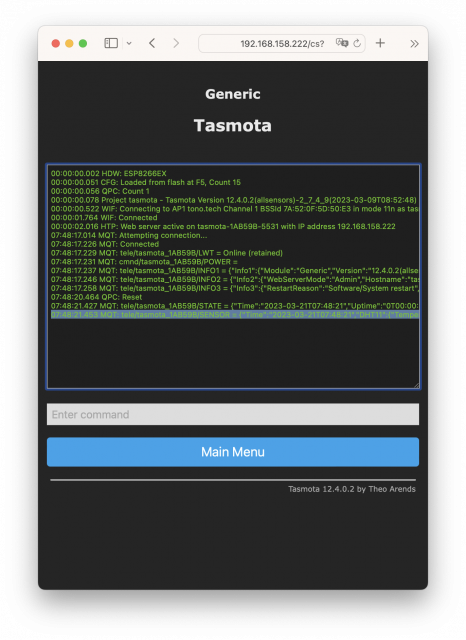
9. คลิก Console จะเห็น Logs ที่ Tasmota ประมาณนี้ เป็นอันใช้ได้แล้ว

07:48:21.453 MQT: tele/tasmota_1AB59B/SENSOR = {"Time":"2023-03-21T07:48:21","DHT11":{"Temperature":24.7,"Humidity":72.0,"DewPoint":19.3},"VINDRIKTNING":{"PM2.5":7},"TempUnit":"C"}

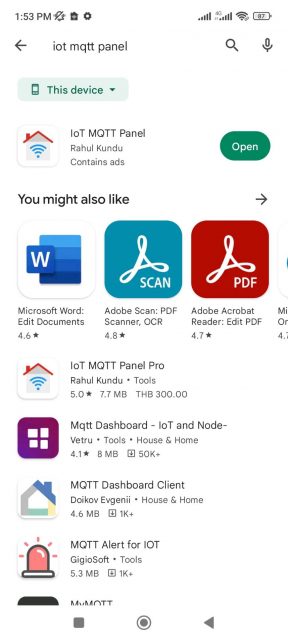
10. Download IoT MQTT Panel จาก Play Store

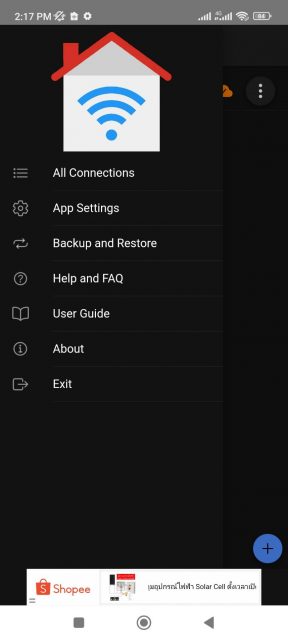
11. เลือก Backup and Restore
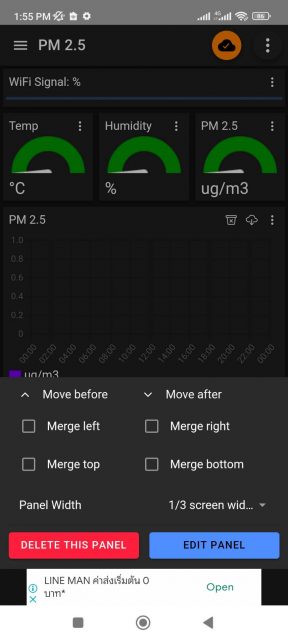
จากนั้นเลือก RESTORE จาก pm25dashboard.json นี้ หรือจะเลือกสร้าง Dashboard ใหม่เองก็ได้
เปลี่ยนชื่อ topic เป์นของ Tasmota Device ของเรา
อย่างเช่นของผมจะเป็น tele/tasmota_1AB59B/SENSOR

pm25dashboard.json

{"dataVersion":120,"globalSettings":{"runInBackground":true,"appTheme":"dark"},"connections":[{"connectionName":"Tasmota PM2.5","clientId":"ub5bvpTlZA","host":"mqtt.tono.tech","port":1883,"connectionType":"tcp","username":"mqtt","password":"XXXXXX","connectionTimeout":30,"keepAlive":60,"autoConnect":true,"disableHostnameCheck":false,"caCertificateFileName":"","clientCertificateFileName":"","clientKeyFileName":"","sslClientPassword":"","enableWillMessage":false,"willTopic":"","willPayload":"","willRetain":false,"willQoS":0,"defaultDashboard":"dashboard_0","connectionId":"connection_0","notifyOnDisconnect":false}],"dashboards":[{"connectionId":"connection_0","dashboardId":"dashboard_0","dashboardName":"PM 2.5","dashboardPrefixTopic":"","lockPanels":true}],"panels":[{"connectionId":"connection_0","dashboardId":"dashboard_0","panelId":"panel_7","panelName":"WiFi Signal","type":"progress","mqttType":"sub","topic":"tele\/tasmota_1AB59B\/STATE","payloadMin":0,"payloadMax":100,"qos":0,"defaultColor":"success","dynamicColor":true,"firstColor":"danger","secondColor":"warning","thirdColor":"success","firstColorEnd":50,"secondColorEnd":80,"disableDashboardPrefix":true,"panelWidth":"100","panelMergeClass":"","showReceivedTimeStamp":true,"unit":"%","orientation":"horizontal","enableNotification":false,"notificationFilter":"all","notificationMin":"","notificationMax":"","notificationValue":"","notificationRegex":"","notificationMessage":"","isJSONPayload":true,"jsonPath":"$.Wifi.RSSI","messageFactor":1,"step":1},{"connectionId":"connection_0","dashboardId":"dashboard_0","panelId":"panel_1","panelName":"Temp","type":"gauge","mqttType":"sub","topic":"tele\/tasmota_1AB59B\/SENSOR","payloadMin":0,"payloadMax":100,"qos":0,"disableDashboardPrefix":false,"panelWidth":"33","firstColor":"#009600","secondColor":"#fac800","thirdColor":"#ff5722","firstColorEnd":33.33,"secondColorEnd":66.67,"panelMergeClass":"","showReceivedTimeStamp":false,"unit":"°C","enableNotification":false,"notificationFilter":"all","notificationMin":"","notificationMax":"","notificationValue":"","notificationRegex":"","notificationMessage":"","isJSONPayload":true,"jsonPath":"$.DHT11.Temperature","messageFactor":"","step":1},{"connectionId":"connection_0","dashboardId":"dashboard_0","panelId":"panel_2","panelName":"Humidity","type":"gauge","mqttType":"sub","topic":"tele\/tasmota_1AB59B\/SENSOR","payloadMin":0,"payloadMax":100,"qos":0,"disableDashboardPrefix":false,"panelWidth":"33","firstColor":"#009600","secondColor":"#fac800","thirdColor":"#ff5722","firstColorEnd":70,"secondColorEnd":100,"panelMergeClass":"","showReceivedTimeStamp":false,"unit":"%","enableNotification":false,"notificationFilter":"all","notificationMin":"","notificationMax":"","notificationValue":"","notificationRegex":"","notificationMessage":"","isJSONPayload":true,"jsonPath":"$.DHT11.Humidity","messageFactor":1,"step":1},{"connectionId":"connection_0","dashboardId":"dashboard_0","panelId":"panel_3","panelName":"PM 2.5","type":"gauge","mqttType":"sub","topic":"tele\/tasmota_1AB59B\/SENSOR","payloadMin":0,"payloadMax":1000,"qos":0,"disableDashboardPrefix":false,"panelWidth":"33","firstColor":"#009600","secondColor":"#fac800","thirdColor":"#ff5722","firstColorEnd":35,"secondColorEnd":85,"panelMergeClass":"","showReceivedTimeStamp":false,"unit":"ug\/m3","enableNotification":false,"notificationFilter":"all","notificationMin":"","notificationMax":"","notificationValue":"","notificationRegex":"","notificationMessage":"","isJSONPayload":true,"jsonPath":"$.VINDRIKTNING.['PM2.5']","messageFactor":1,"step":10},{"connectionId":"connection_0","dashboardId":"dashboard_0","panelId":"panel_0","panelName":"PM 2.5","type":"line-graph","mqttType":"sub","qos":0,"comboItemList":[{"topic":"tele\/tasmota_1AB59B\/SENSOR","label":"ug\/m3","color":"#7b00f5","showArea":true,"showPoints":true,"unit":"","enableNotification":false,"notificationFilter":"all","notificationMin":"","notificationMax":"","notificationValue":"","notificationRegex":"","notificationMessage":"","isJSONPayload":true,"jsonPath":"$.VINDRIKTNING.['PM2.5']","messageFactor":1}],"disableDashboardPrefix":false,"panelWidth":"100","panelMergeClass":"","maxPersistence":50,"smoothCurve":true},{"connectionId":"connection_0","dashboardId":"dashboard_0","panelId":"panel_4","panelName":"Temp","type":"line-graph","mqttType":"sub","qos":0,"comboItemList":[{"topic":"tele\/tasmota_1AB59B\/SENSOR","label":"°C","color":"#99ff99","showArea":true,"showPoints":true,"unit":"°C","enableNotification":false,"notificationFilter":"all","notificationMin":"","notificationMax":"","notificationValue":"","notificationRegex":"","notificationMessage":"","isJSONPayload":true,"jsonPath":"$.DHT11.Temperature","messageFactor":1}],"disableDashboardPrefix":false,"panelWidth":"100","panelMergeClass":"","maxPersistence":50,"smoothCurve":true},{"connectionId":"connection_0","dashboardId":"dashboard_0","panelId":"panel_5","panelName":"Humidity ","type":"line-graph","mqttType":"sub","qos":0,"comboItemList":[{"topic":"tele\/tasmota_1AB59B\/SENSOR","label":"%","color":"#007bf5","showArea":true,"showPoints":true,"unit":"%","enableNotification":false,"notificationFilter":"all","notificationMin":"","notificationMax":"","notificationValue":"","notificationRegex":"","notificationMessage":"","isJSONPayload":true,"jsonPath":"$.DHT11.Humidity","messageFactor":1}],"disableDashboardPrefix":false,"panelWidth":"100","panelMergeClass":"","maxPersistence":50,"smoothCurve":true}]}

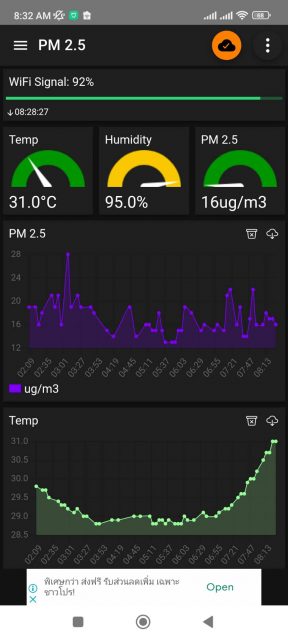
12. ถ้าเสร็จเรียบร้อย เราก็จะได้ Dashboard ไว้ใช้งานแล้วครับ

PM 2.5 Dashboard

* เพิ่มเติมครับ วิธีการ Hard Reset Tasmota กลับไปเป็นค่า default

1. ถอดสาย USB ออก 30s
2. เสียบสาย ถอดสาย สลับกัน 7 ครั้ง (ครั้งละไม่เกิน 5s)

เป็นอย่างไรกันบ้างครับ ไม่ยากเลยใช่ไหมครับ ในการทำ Dashboard ดีๆ ไว้ดูคุณภาพอากาศ สำหรับช่วง PM 2.5 ประเทศเรา เป็นผู้นำอันดับโลก แบบนี้ 🙂
ถ้าสงสัยหรืออยากสอบถามเพิ่มเติม comment ไว้ตรงนี้ หรือ add LINE ID: pornpasok เข้ามาพูดคุยกันได้ครับ ..

trick ในการใช้งาน IoT SIM แบบไหนประหยัดสุด?

true แบบเติมเงิน

วันนี้ ผมจะมาเล่า trick เล็กๆ น้อยๆ ในการเลือกใช้งาน IoT SIM สำหรับ อุปกรณ์​ IoT ของเรากันนะครับ .. ว่าทำอย่างไร จะคุ้มค่าและประหยัดสุด ..และพูดถึงเหตุผลที่ทำไม ผมยังไม่เลือกใช้บอร์ด NB-IoT ของค่ายมือถือต่างๆ ..

ปัจจุบัน ค่ายมือถือ ไม่ว่าจะเป็น ais, dtac, true ต่างก็ออกบอร์ด NB-IoT ของตัวเองกันออกมา พร้อมกับแถม package data สำหรับ IoT ให้ด้วย .. แต่ราคาผมมองว่ายังสูงไปครับ คือประมาณ 2-3000 บาท/บอร์ด ..

ส่วนราคา โดยประมาณ สำหรับ package ที่แต่ละค่ายตั้งไว้ ก็ประมาณนี้ครับ
ais 350 บาท/ปี
dtac 420 บาท/ปี
true 330 บาท/ปี

ให้ data ประมาณ 10MB/ปี (น้อยมาก) แต่อุปกรณ์ IoT เรา ก็ใช้ส่ง data ขนาดเล็กเข้าไปเก็บใน server อีกทีนึงครับ ส่วนใหญ่จะเอาไว้ทำ Sensors Node กัน .. ไม่ได้ต้องการ data มากมายอะไร ..

สรุป ข้อดี/ข้อเสีย ของ บอร์ด NB-IoT ของค่ายมือถือ

ข้อดี
– สะดวก ใช้งานได้ทันที
– มีการรับประกัน ถ้าบอร์ดมีปัญหา

ข้อเสีย
– แพง ถ้าเรานำไปใช้งานหลายๆ จุด ก็จะใช้งบประมาณจำนวนมาก
– ไม่สามารถนำ SIM ไปใช้ร่วมกับอุปกรณ์อื่นได้ เพราะส่วนใหญ่เป็น e-SIM
– ไม่สามารถย้ายค่ายได้ เพราะบอร์ด ผูกติดกับค่าย

ด้วยเหตุผลด้านบน เมื่อเปรียบเทียบข้อดี ข้อเสีย ของบอร์ด NB-IoT จากค่าย ผมเลยยังไม่เลือกใช้งาน เพราะว่างานที่ผมทำ ต้องใช้หลายจุด ต้องใช้งบประมาณอย่างประหยัด .. และที่สำคัญ Wi-Fi เข้าไม่ถึง ก็เลยไม่สามารถใช้บอร์ด ที่รองรับระบบ Wi-Fi ได้ +___+

แล้วแบบนี้ ซื้อพวก SIM เทพใช้ จะคุ้มไหม?

– ไม่คุ้มแน่นอนครับ ด้วยเหตุผลด้านบน คือ เราใช้ data จริงๆ น้อยมาก พวก SIM เทพ เหมาะกับคนที่ใช้ data จำนวนมากๆ ดูหนัง ฟังเพลง หรือ ทำเป็น AP ในพื้นที่ห่างไกลอินเตอร์เน็ตเข้าถึง .. บ้านผมเอง ก็ใช้ครับ ..

แล้วทำยังไง ถึงจะใช้อุปกรณ์ IoT ได้อย่างประหยัดดีล่ะ?

TTGO T-Call v1.4

– ใช้บอร์ดที่ใส่ SIM ได้ ราคาประมาณ​ 300-500 บาท
– ใช้ SIM ทรู แบบเติมเงินครับ data 1MB ประมาณ 1 บาท เท่านั้น เติม 10 บาท อยู่ได้ 30 วัน
1 ปี เราก็จะใช้เงินเพียงประมาณ 120 บาท เท่านั้นครับ ประหยัดกว่าเยอะ ..

ใครมี trick เพิ่มเติมอะไร ก็มาเล่าสู่กันฟังได้นะครับ หรืออยากสอบถามอะไรเพิ่มเติม ก็ comment เข้ามาได้ครับ 🙂

ESP Weather Station

ESP Weather Station


คลิปสอนทำ Weather Station แบบง่ายๆ ราคาไม่ถึง 300 บาท

สวัสดีปีใหม่ 2021 ครับ เพื่อนๆ พี่ๆ น้องๆ ทุกท่าน ขอให้ปีนี้เป็นปีที่ดีนะครับ 🙂
ปีที่ผ่านมา ผมเองก็ไม่ได้มา update blog ส่วนตัวเลยครับ +___+

วันนี้มีโอกาสดี ได้หยุดยาว กลับมาอยู่บ้านที่จันทบุรี ก็เลยถือโอกาส เขียนเล่าวิธีการ
ทำ Weather Station แบบง่ายๆ และราคาถูกมาก ไม่เกิน 300 บาท ที่ใครๆ ก็ทำเองได้ ..

ตัวอย่าง ที่ผมทำเล่น ไว้ที่สวนที่จันทบุรี จะประมาณนี้ครับ
https://tonofarm.herokuapp.com/

Weather Station Dashboard

ในส่วนของ Dashboard ที่ใช้แสดงผล จะใช้ของฟรี บน Cloud ของ Heroku นะครับ (ฟรีแต่ต้องเอามาประกอบร่างกันเอง + Coding นิดหน่อย)
ถ้าใครยังไม่เคยใช้งาน Heroku ลองเข้าไปอ่านบนความที่ผมเคยเขียนไว้ ได้ครับ ..
https://ton.packetlove.com/blog/iot/line-bot-node-js-mqtt-esp32-iot-2.html

Stack ในส่วนของ Dashboard ที่ผมเลือกใช้ จะเป็น PHP+MySQL ที่ทุกคนสามารถเรียนรู้ได้ง่าย และรวดเร็ว และส่วนของ graph Time series จะเป็น Highcharts ที่ใช้งานได้ง่ายมาก ..

ส่วนของ Hardware จะใช้เป็น ESP8266 (NodeMCU v3) + BME280 Sensor (Temperature, Humidity, Pressure) แค่นี้ ก็ใช้งานได้ละครับ ..
แต่ถ้าใครอยากได้ Options เสริม ทำให้ สามารถนำ Weather Station ของเราไปตั้งที่ไหนก็ได้ ก็ต้องเพิ่ม ในส่วนของ Battery ซึ่งในที่นี้ ผมเลือกใช้เป็น 18650 1 ก้อนครับ + Solar Panel + TP4056 1A Micro USB Battery Charger แค่นี้ก็เหลือๆ อยู่ได้สบายๆ เป็นปีๆ ครับ เพราะว่า ใช้เทคนิค ที่เรียกว่า Deep Sleep Mode ทำให้ Weather Station ของเรา ประหยัดพลังงานได้มาก ..

สรุป Stack ที่เราจะใช้ และ อุปกรณ์ ที่เราจะต้องใช้กันมีประมาณนี้ครับ สามารถดัดแปลงแก้ไข ได้ตามความเหมาะสม ..

มาเริ่มกันเลยดีกว่าครับ .. 🙂

0.ความรู้ที่ต้องมี ในบทความนี้

– การใช้งาน Arduino IDE เบื้องต้น
– การเขียน HTML, PHP เบื้องต้น
– การใช้งาน DB MySQL (MariaDB) เบื้องต้น
– การใช้งาน Git เบื้องต้น
– ตัวอย่าง code https://github.com/pornpasok/esp-weather-station

1.เตรียมอุปกรณ์

Hardware
– ESP8266 หรือ ESP32 ก็ได้ครับ ในที่นี้ผมใช้ NodeMCU v3 ราคา 54 บาท
– BME280 (Temperature, Humidity, Pressure) ราคา 80 บาท

Options
– Battery 18650 1 ก้อน ราคา 50 บาท
– Solar Panel 6V ราคา 30 บาท
– TP4056 1A Micro USB Battery Charger ราคา 8 บาท
– กล่องกันน้ำ IP66 ราคา 90 บาท

2.สมัครใช้บริการ Heroku สำหรับใช้งาน PHP+MySQL

– ทำตามที่ผมเคยเขียนไว้ในบทความก่อน ได้เลยครับ
https://ton.packetlove.com/blog/iot/line-bot-node-js-mqtt-esp32-iot-2.html
– เลือก Add-ons JawsDB Maria (ฟรีนะครับ)

JawsDB Maria

3.จากนั้นเราจะได้ หน้าตา Dashboard สำหรับ DB ของเรา ซึ่งจะมีค่าต่างๆ ที่จำเป็นดังนี้

Host: xxxx.cbetxkdyhwsb.us-east-1.rds.amazonaws.com
Username: xxxjmq9y0lbpccfl
Password: xxxqfwd3ch9ynzom
Port: 3306
Database: xxxt7s4yvc54h02i

DB Information

4.ทำการ Clone Soure Code ที่ผมทำไว้ให้เป็นตัวอย่างลงมา

– git clone https://github.com/pornpasok/esp-weather-station
– จะมี files ต่างๆ ประมาณนี้

tree
.
├── NodeMCUv3_BME280_deepsleep.ino (สำหรับ Upload ลง ESP8266 ของเรา)
├── README.md
├── SensorData.sql (สำหรับ import DB Structure ลง DB ที่ Heroku)
├── esp-database.php (สำหรับ config การ connect DB ที่ Heroku ค่านี้ได้จากข้อ 3.)
├── esp-post-data.php (สำหรับ รับค่าจาก อุปกรณ์ IoT ของเรา ในที่นี้คือ ESP8266)
├── esp-style.css (สำหรับ ตกแต่งหน้าตา Dashboard)
├── images
│   ├── dashboard01.png
│   ├── dashboard02.png
│   ├── dashboard03.png
│   └── esp-weather-station.jpg
└── index.php (หน้าแสดงผล ของ Dashboard)

5.Import DB Structure ลง DB ที่เราได้จาก Heroku

– ในที่นี้ ใช้ได้หลายวิธี แล้วแต่ถนัด แต่ส่วนตัวผมใช้ extensions “MySQL Client for vscode
– จากนั้น ให้นำค่า Host, Username, Password, Port ที่ได้จาก ข้อ 3. มา config เพื่อใช้งาน
– จากนั้นคลิกขวา ที่ DB เลือก Import Sql แล้วเลือก file “SensorData.sql” ที่เราทำการ clone มาจาก ข้อ 4. แค่นี้ เราก็จะได้ โครงสร้างของ tables ใน DB ของเราแล้ว ..

vscode Import Sql

6.แก้ไข config file “esp-database.php” และ “esp-post-data.php”

– นำค่า Host, Username, Password, Database ที่ได้จาก ข้อ 3. มาแก้ไข ใน file “esp-database.php

$servername = "HOSTNAME";
$dbname = "DBNAME";
$username = "USERNAME";
$password = "PASSWORD";

– แก้ไข file “esp-post-data.php” ใสส่วนของ

$api_key_value = "********";

ค่า api_key_value เรากำหนดเองได้เลย และจะต้องเอาไปใช้ ในส่วนของ อุปกรณ์ IoT (ESP8266) ของเรา

7.ทำการ push App (Dashboard) ของเรา ขึ้น Heroku

– ทำตามนี้ได้เลยครับ https://devcenter.heroku.com/articles/getting-started-with-php

เท่านี้ เราก็จะได้ App (Dashboad) ในฝั่งของ Heroku Cloud กันแล้วครับ .. 🙂
มาต่อกันที่ฝั่งของ อุปกรณ์ IoT (ESP8266) ของเรากันดีกว่าครับ ..

8.การต่อวงจร BME280 wiring to ESP8266/ESP32

The ESP8266 I2C pins are:
– GPIO 5 (D1): SCL (SCK)
– GPIO 4 (D2): SDA (SDI)

BME280 wiring to ESP8266

The ESP32 I2C pins are:
– GPIO 22: SCL (SCK)
– GPIO 21: SDA (SDI)

BME280 wiring to ESP32

9.ใช้ Arduino IDE แก้ไข code ในส่วนของ อุปกรณ์ IoT (ESP8266)

– แก้ไข file “NodeMCUv3_BME280_deepsleep.ino” ตามระบบ WIFI และ URL App เรา

const char* ssid = "WIFI-SSID";
const char* password = "WIFI-PASSWORD";
const char* serverName = "http://app-name.herokuapp.com/esp-post-data.php";
String apiKeyValue = "********";
String sensorName = "BME280";
String sensorLocation = "37.8718992,-122.2585399";

– จากนั้นทำการ Upload code แล้วเปิด Serial Monitor ดู ว่ามี Error อะไรไหม? ถ้าทุกอย่างปกติ ก็จะได้ข้อความดังภาพด้านล่าง ก็ถือว่าเป็นอันใช้ได้ 🙂

Arduino Serial Monitor

10.ทดลอง เข้า หน้าเว็บ Dashboard ของเรา ที่ทำไว้

– เข้าด้วย URL: https://app-name.herokuapp.com/
ตัวอย่างของผมคือ https://tonofarm.herokuapp.com/

ส่วน Options เพิ่มเติม ที่จะนำไปต่อยอด ก็ประมาณนี้ครับ

– ใช้ Battery 18650
– ใช้ Solar Panel + ชุด Charge Battery
– ใส่กล่อง IP66 กันน้ำ เผื่อเอาไปใช้ Outdoor
– เพิ่ม-ลด Sensors ตามความต้องการ
– ปรับแต่ง Dashboard ให้เหมาะสมตามความต้องการ

เป็นอย่างไรกันบ้างครับ ไม่ยากใช่ไหมครับ เอาไว้ทำเล่นๆ เราก็จะได้ Weather Station ของเราเองเอาไว้ใช้งาน และสามารถเข้าจากที่ไหน ก็ได้ เพราะอยู่บน Heroku Cloud ที่สำคัญ ฟรีด้วยครับ 🙂

สำหรับเพื่อนๆ ท่านใด ที่ติดปัญหา ตรงไหน สามารถสอบถามกันเข้ามาได้นะครับ
LINE ID: pornpasok

LINE ID: pornpasok

Add Friend

Source Code: https://github.com/pornpasok/esp-weather-station

รายละเอียดเพิ่มเติม: https://randomnerdtutorials.com/cloud-weather-station-esp32-esp8266/

LINE Bot + node.js + MQTT + ESP32 (IoT) เปิด/ปิด ไฟ (ตอนที่ 2)

สวัสดีครับ จากตอนที่แล้ว ที่ผมพูดถึงรายละเอียดต่างๆ ที่จะใช้ในการทำ ระบบเปิด/ปิด ไฟ
ว่าต้องใช้อะไรบ้าง วันนี้ จะมาลงรายละเอียด ในแต่ละส่วนกันครับ ..
อ่านตอนที่ 1 ได้ที่ LINE Bot + node.js + MQTT + ESP32 (IoT) เปิด/ปิด ไฟ (ตอนที่ 1)

การทำงานคือ ผมจะสามารถสั่ง ให้บอท (LINE Messaging API) สั่งเปิด/ปิดไฟ ได้ผ่าน การ chat ดังภาพ

0.ความรู้ที่ต้องมี ในบทความนี้

– การใช้งาน Arduino IDE เบื้องต้น
– การเขียน node.js เบื้องต้น
– การใช้งาน LINE Messaging API เบื้องต้น
– การใช้งาน Git เบื้องต้น

1.เตรียมอุปกรณ์


สำหรับบอร์ด ESP32 ที่ผมจะใช้ในการทดลองนี้ จะเป็น Node32 Lite นะครับ สามารถหาซื้อได้ที่นี่ครับ ราคา 275 บาท
https://www.gravitechthai.com/product-detail.php?WP=pQugZKpmGQAgG2rDqYyc4Uuw

ปล.หรือถ้าเพื่อนๆ มีบอร์ดอื่นๆ เช่น ESP8266, NodeMCU อยู่แล้ว ก็สามารถใช้งานได้เหมือนกันครับ

2.สมัครใช้บริการ LINE Messaging API


LINE Developers

ตรงส่วนวิธีการสมัครใช้งาน LINE Messaging API มีหลายๆ ท่านเขียนบทความไว้แล้ว ตัวอย่างเช่น

LINE Bot 101 — จับมือทำบอท ของคุณ Sitthi Thiammekha (LINE API Expert)

สร้าง LINE Bot ด้วย Node.js + Messaging API — A Beginner’s Guide ของคุณ Ingkwan

3.สมัครใช้บริการ Heroku สำหรับ CloudMQTT Server


Heroku.com

เมื่อกรอกรายละเอียดการสมัครเสร็จแล้ว เราจะเข้าสู่ Dashboard ของ Heroku ครับ


– ที่หน้า Dashboard เลือก New > Create new app


– ตั้งชื่อ App ของเรา ในที่นี้ผมตั้งชื่อ esp32-mqtt

ถ้าสร้างสำเร็จ เราจะเข้าหน้าแรก ของ App เราได้ละ อย่างของผมจะเป็น
https://esp32-mqtt.herokuapp.com/


– ที่ Resources เลือก Find more add-ons


– เลือก CloudMQTT


– เลือก Install CloudMQTT


– เลือก App ที่จะ Install CloudMQTT ในที่นี้ ของผมคือ esp32-mqtt


– เลือก Provision add-on


– เสร็จแล้วจะได้ดังนี้ ให้เราคลิกเพื่อดูรายละเอียดของ CloudMQTT ของเราได้ที่ menu ด้านล่าง


– ค่า config CloudMQTT ตรงนี้ เดี๋ยวเราจะใช้กับ webhook ที่เป็น node.js ของเรานะครับ

4.LINE Bot API Code (node.js)

File หลักๆ ที่เราจะใช้ ในการ Deploy ขึ้น Heroku App ของเรา มี 2 file ครับคือ
Procfile (ไม่ต้องมี .txt) นะ ใช้สำหรับบอกว่า ให้ App เราทำงานแบบไหน เรียก file ไหน
index.js เป็น file หลัก ของ LINE Bot API เราครับ

จากนั้น เรามาดูที่ code ที่เป็น LINE Bot API กันครับ
ส่วนที่เราจะต้องแก้ไข หลักๆ มีด้วยกัน 3 จุดครับคือ

CH_ACCESS_TOKEN คือค่า ยาวๆ ที่เราได้จาก Channel access token (long-lived) ของ Messaging API
mqtt_host คือค่าที่เราได้จาก CloudMQTT บน Heroku
options คือค่าต่างๆ ที่เราได้จาก CloudMQTT บน Heroku เช่นกันครับ

Code LINE Bot API ที่เป็น node.js สำหรับ Deploy ขึ้น Heroku ของเราครับ
ใครที่เขียน code คล่องๆ แก้ไข ให้ code สวยงาม กระชับกว่านี้ได้นะครับ อันนี้ผมเขียนแบบด่วนๆ มาก 🙁

Procfile

web: node index.js


index.js

var express = require('express')
var bodyParser = require('body-parser')
var request = require('request')
var app = express()

var mqtt = require('mqtt');

// Your Channel access token (long-lived) 
const CH_ACCESS_TOKEN = '';

// MQTT Host
var mqtt_host = 'mqtt://m15.cloudmqtt.com';

// MQTT Topic
var mqtt_topic = '/ESP32';

// MQTT Config
var options = {
    port: 15443,
    host: 'mqtt://m15.cloudmqtt.com',
    clientId: 'mqttjs_' + Math.random().toString(16).substr(2, 8),
    username: 'mqttuser',
    password: 'mqttpass',
    keepalive: 60,
    reconnectPeriod: 1000,
    protocolId: 'MQIsdp',
    protocolVersion: 3,
    clean: true,
    encoding: 'utf8'
};


app.use(bodyParser.json())

app.set('port', (process.env.PORT || 4000))
app.use(bodyParser.urlencoded({extended: true}))
app.use(bodyParser.json())

app.post('/webhook', (req, res) => {
  var text = req.body.events[0].message.text.toLowerCase()
  var sender = req.body.events[0].source.userId
  var replyToken = req.body.events[0].replyToken
  console.log(text, sender, replyToken)
  console.log(typeof sender, typeof text)
  // console.log(req.body.events[0])

  if (text === 'info' || text === 'รายงาน') {
    // Info
    inFo(sender, text)
  }
  else if (text === '1' || text === 'เปิด' || text === 'on') {
    // LED On
    ledOn(sender, text)
  }
  else if (text === '0' || text === 'ปิด' || text === 'off') {
    // LED Off
    ledOff(sender, text)
  }
  else {
    // Other
    sendText(sender, text);
  }

  res.sendStatus(200)
})

function sendText (sender, text) {
  let data = {
    to: sender,
    messages: [
      {
        type: 'text',
        text: 'กรุณาพิมพ์ : info | on | off | เปิด | ปิด เท่านั้น'
      }
    ]
  }
  request({
    headers: {
      'Content-Type': 'application/json',
      'Authorization': 'Bearer '+CH_ACCESS_TOKEN+''
    },
    url: 'https://api.line.me/v2/bot/message/push',
    method: 'POST',
    body: data,
    json: true
  }, function (err, res, body) {
    if (err) console.log('error')
    if (res) console.log('success')
    if (body) console.log(body)
  })
}

function inFo (sender, text) {
  let data = {
    to: sender,
    messages: [
      {
        type: 'text',
        text: 'uid: '+sender
      }
    ]
  }
  request({
    headers: {
      'Content-Type': 'application/json',
      'Authorization': 'Bearer '+CH_ACCESS_TOKEN+''
    },
    url: 'https://api.line.me/v2/bot/message/push',
    method: 'POST',
    body: data,
    json: true
  }, function (err, res, body) {
    if (err) console.log('error')
    if (res) console.log('success')
    if (body) console.log(body)
  })
}


function ledOn (sender, text) {
  var client = mqtt.connect(mqtt_host, options);
  client.on('connect', function() { // When connected
      console.log('MQTT connected');
      // subscribe to a topic
      client.subscribe(mqtt_topic, function() {
          // when a message arrives, do something with it
          client.on('message', function(topic, message, packet) {
              console.log("Received '" + message + "' on '" + topic + "'");
          });
      });
      

      // publish a message to a topic
      client.publish(mqtt_topic, 'on', function() {
          console.log("Message is published");
          client.end(); // Close the connection when published
      });
      
  });
    

  let data = {
    to: sender,
    messages: [
      {
        type: 'text',
        text: 'LED ON'
      }
    ]
  }
  request({
    headers: {
      'Content-Type': 'application/json',
      'Authorization': 'Bearer '+CH_ACCESS_TOKEN+''
    },
    url: 'https://api.line.me/v2/bot/message/push',
    method: 'POST',
    body: data,
    json: true
  }, function (err, res, body) {
    if (err) console.log('error')
    if (res) console.log('success')
    if (body) console.log(body)
  })
}

function ledOff (sender, text) {
  var client = mqtt.connect(mqtt_host, options);
  client.on('connect', function() { // When connected
      console.log('MQTT connected');
      // subscribe to a topic
      client.subscribe(mqtt_topic, function() {
          // when a message arrives, do something with it
          client.on('message', function(topic, message, packet) {
              console.log("Received '" + message + "' on '" + topic + "'");
          });
      });
      

      // publish a message to a topic
      client.publish(mqtt_topic, 'off', function() {
          console.log("Message is published");
          client.end(); // Close the connection when published
      });
      
  });

  let data = {
    to: sender,
    messages: [
      {
        type: 'text',
        text: 'LED OFF'
      }
    ]
  }
  request({
    headers: {
      'Content-Type': 'application/json',
      'Authorization': 'Bearer '+CH_ACCESS_TOKEN+''
    },
    url: 'https://api.line.me/v2/bot/message/push',
    method: 'POST',
    body: data,
    json: true
  }, function (err, res, body) {
    if (err) console.log('error')
    if (res) console.log('success')
    if (body) console.log(body)
  })
}

app.listen(app.get('port'), function () {
  console.log('run at port', app.get('port'))
})


– CH_ACCESS_TOKEN คือค่ายาวๆ ตรงนี้แหละครับ


– mqtt_host กับ options คือค่าที่ได้จาก CloudMQTT ตรงนี้ครับ

5.Deploy Webhook API code ขึ้น Heroku

จาก Step 3 ที่เราสร้าง App ของเราไว้ อย่างของผมจะชื่อ esp32-mqtt ให้เราเข้ามาที่ Deploy

– อันดับแรกเลย ถ้าเรายังไม่เคยใช้ Heroku ให้ Download และ Install Heroku CLI กันก่อนที่
Download and install the Heroku CLI


– หลังจากลง Heruku CLI เสร็จแล้ว ที่ Terminal พิมพ์ heroku login


– ตัว Browser จะเด้งหน้า Heroku Login ขึ้นมา ให้เราทำการ Login ให้เรียบร้อย


– เมื่อเรา Login สำเร็จแล้ว ก็จะเข้าสู่ขั้นตอนถัดไป ที่ Terminal (CLI)

ทำการสร้าง Git repository

cd my-project/
git init
heroku git:remote -a esp32-mqtt

ทดลอง Deploy

git add .
git commit -am "make it better"
git push heroku master

จากนั้น สร้าง file จาก Step 4 คือ Procfile กับ index.js ที่ Directory ที่สร้างขึ้น อย่างของผมจะเป็น esp32-mqtt

จากนั้น install module ที่จำเป็น ที่เราใช้ในการเขียน App ของเรา ดังนี้

npm init
npm install express --save
npm install request --save
npm install mqtt --save

เราจะได้ file ต่างๆ เพิ่มเข้ามา ใน directory ของเรา

ทดลอง run Wehhook API ที่เราเขียน ด้วย node.js ค่า default จะเป็น port 4000
node index.js

เข้าผ่าน localhost:4000 จะได้ดังรูป Error ไม่เป็นไรครับ ถือว่าทำงานได้แล้ว เพราะเราไม่รับ GET

ทำการ Deploy code จริง ขึ้น Heroku

git add .
git commit -am "add Procfile index.js"
git push heroku master

จากนั้นลองเข้า App ของเราผ่าน URL ที่เราทำการตั้งไว้ อย่างของผมจะเป็น
https://esp32-mqtt.herokuapp.com/

หน้าจะจะได้แบบนี้ ไม่ต้องตกใจครับ เพราะเราไม่รับ GET
แต่ถ้าไม่ได้ ให้เราลองใช้ CLI ดู logs ว่าผิดพลาดตรงไหน

heroku logs --tail

เสร็จแล้วครับ LINE Bot API (webhook) ของเรา บน Heroku .. 🙂

6.Config Webhook API ของเราเข้ากับ LINE Messaging API

มาถึงขั้นตอนสุดท้ายในส่วนของ Webhook API ของเรากันแล้วครับ นั่นคือ การผูกกับ LINE Messaging API

– ขั้นตอนแรก เราต้องไป Use webhooks ให้ Enabled แล้ว Save ก่อนนะครับ ตกม้าตาย ตรงนี้กันมาเยอะแล้ว 🙁
– จากนั้น ใส่ URL ของ App เรา ที่ได้จาก Heroku แล้วตามด้วย /webhook ครับ อย่างของผมก็จะเป็น
https://esp32-mqtt.herokuapp.com/webhook
– จากนั้น กด Verify ดูครับ ถ้าไม่มีอะไรผิดพลาด ก็จะ Success ครับ 🙂


– ประมาณนี้ ก็เป็นอันว่า เรียบร้อยแล้วครับ LINE Messaging API กับ Webhook บน Heroku เราใช้งานได้แล้ว 🙂

7.เขียน code Arduino ให้กับ Node32 Lite

ดูวิธีการติตตั้งบอร์ดใหม่ๆ (Node32 Lite) เข้าไปใน Arduino IDE ได้ที่นี่ครับ
http://www.ayarafun.com/2018/12/how-to-setup-lamloei-32-lite-with-arduino/

เลือกชนิดของ Board ที่เราใช้ให้ถูกต้อง แล้วทำการ Verify และ Upload Code โลดครับ ..

– ในที่นี้ผมใช้บอร์ด Node32 Lite จะต้องเลือกเป็น Node32s รุ่นพี่มันครับ 🙂

ตัว Arduino IDE ให้เราทำการ add Library PubSubClient กับ WiFiManager เข้าไปด้วยครับ


– ไปที่ Tools > Manage Libraries…


Manage Libraries…


– Add Lib PubSubClient


– Add Lib WiFiManager

สำหรับ code จะมี 2 แบบ คือ

แบบ ที่ 1 fix SSID กับ password ไปใน code เลย แบบนี้จะดี ตรงที่เราไม่ต้องมา config ให้บอร์ดเราไปเกาะ WiFi อีกรอบ เหมาะสำหรับการทดลอง หรือใช้ SSID เดิมตลอด ..


– ถ้าเราดูจาก Serial Monitor จะเห็นรายละเอียดการ connect แบบ fix SSID ดังนี้

แบบ ที่ 2 ใช้ WiFiManager คือจะสามารถ config ให้ Node32 Lite ของเราไปเกาะ SSID (AP) ตัวที่เราต้องการได้ อันนี้จะสะดวก เวลาไปใช้งานจริง ไม่ต้อง Upload code เข้าไปใหม่


– วิธีการ config ด้วย WiFiManager หลังจาก Upload Code เสร็จ ให้เราไปเกาะ SSID ชื่อ ESP32_xxxxxx จะขึ้นหน้า menu config ดังรูป


– จากนั้นเลือก SSID(AP) ที่เราต้องการจะให้ไปเกาะ ใส่ password แล้วกด Save


– ถ้าเราดูจาก Serial Monitor จะเห็นรายละเอียดการ connect แบบใช้ WiFiManager ดังนี้

มาดูในส่วนของ Code กันครับ

Code แบบที่ 1 fix SSID กับ password ใน code

#include <PubSubClient.h>
#include <WiFi.h>

// Update these with values suitable for your network.
const char* ssid = "tonofarm.io"; // AP Name
const char* password = "********"; // AP Password

// Config MQTT Server
#define mqtt_server "m15.cloudmqtt.com"
#define mqtt_port 15443
#define mqtt_user "mqttuser"
#define mqtt_password "mqttpass"

WiFiClient espClient;
PubSubClient client(espClient);

void setup() {
  // Set LED_BUILTIN 
  pinMode(LED_BUILTIN, OUTPUT);

  Serial.begin(115200);
  delay(10);

  Serial.println();

  Serial.print("Connecting to ");
  Serial.println(ssid);

  WiFi.begin(ssid, password);

  while (WiFi.status() != WL_CONNECTED) {
    delay(500);
    Serial.print(".");
  }

  Serial.println("");
  Serial.println("WiFi connected");
  Serial.println("IP address: ");
  Serial.println(WiFi.localIP());

  client.setServer(mqtt_server, mqtt_port);
  client.setCallback(callback);
}

void loop() {
  if (!client.connected()) {
    Serial.print("Attempting MQTT connection...");
    if (client.connect("ESP32Client", mqtt_user, mqtt_password)) {
      Serial.println("connected");
    } else {
      Serial.print("failed, rc=");
      Serial.print(client.state());
      Serial.println(" try again in 5 seconds");
      delay(5000);
      return;
    }
  } else {
    // MQTT Topic /ESP32
    client.subscribe("/ESP32");
  }
  client.loop();
}

void callback(char* topic, byte* payload, unsigned int length) {
  Serial.print("Message arrived [");
  Serial.print(topic);
  Serial.print("] ");
  String msg = "";
  int i = 0;
  while (i < length) msg += (char)payload[i++];
  Serial.println(msg);
  digitalWrite(LED_BUILTIN, (msg == "on" ? LOW : HIGH));
}

Code แบบที่ 2 ใช้ WiFiManager ในการ config

#include                    //this needs to be first, or it all crashes and burns...
#include 
#include 
#include 
#include 

//flag for saving data
bool shouldSaveConfig = false;

//callback notifying us of the need to save config
void saveConfigCallback () {
  Serial.println("Should save config");
  shouldSaveConfig = true;
}

// Config MQTT Server
#define mqtt_server "m15.cloudmqtt.com"
#define mqtt_port 15443
#define mqtt_user "mqttuser"
#define mqtt_password "mqttpass"

WiFiClient espClient;
PubSubClient client(espClient);

void setup() {
  // Set LED_BUILTIN 
  pinMode(LED_BUILTIN, OUTPUT);

  Serial.begin(115200);
  delay(10);

  Serial.println();

  WiFiManager wifiManager;
  wifiManager.autoConnect();

  client.setServer(mqtt_server, mqtt_port);
  client.setCallback(callback);
}

void loop() {
  if (!client.connected()) {
    Serial.print("Attempting MQTT connection...");
    if (client.connect("ESP32Client", mqtt_user, mqtt_password)) {
      Serial.println("connected");
    } else {
      Serial.print("failed, rc=");
      Serial.print(client.state());
      Serial.println(" try again in 5 seconds");
      delay(5000);
      return;
    }
  } else {
    // MQTT Topic /ESP32
    client.subscribe("/ESP32");
  }
  client.loop();
}

void callback(char* topic, byte* payload, unsigned int length) {
  Serial.print("Message arrived [");
  Serial.print(topic);
  Serial.print("] ");
  String msg = "";
  int i = 0;
  while (i < length) msg += (char)payload[i++];
  Serial.println(msg);
  digitalWrite(LED_BUILTIN, (msg == "on" ? LOW : HIGH));
}

Source Code ใน GitHub ตามนี้เลยครับ https://github.com/pornpasok/esp32_line_bot_mqtt

8.เรียบร้อยแล้ว ทดสอบใช้งาน

ทำการ Add LINE Bot ของเรา ก่อนนะ จากนั้นทดลองดังนี้ได้เลย

- ถ้าเราพิมพ์ On/on/เปิด/1 ไฟ LED ที่ตัว Node32 Lite ของเราก็จะติดครับ
- ถ้าเราพิมพ์ Off/off/ปิด/0 ไฟ LED ที่ตัว Node32 Lite ของเราก็จะดับครับ
- ถ้าเราพิมพ์ info/รายงาน บอทของเรา ก็จะรายงาน UID ของเราครับ เพื่อเอาไปใช้งานต่อยอดอื่นๆ

ปล. เดี๋ยวพรุ่งนี้ ถ่าย Video มาให้ดูกันนะครับ ว่าการทำงานของมันเป็นยังไง ถ่ายเองกดเอง ไม่ไหว 🙁

Next Step ...

- ต่อกับ Relay เพื่อใช้งานกับอุปกรณ์ไฟฟ้าจริงครับ (อันนี้อันตรายนะครับ ต้องระวังด้วยเพราะเล่นกับไฟ 220v)
- ต่อยอดให้ LINE Bot ของเรา มีความสามารถมากกว่านี้ครับ เช่น monitor หรือรายงาน ค่าต่างๆ ให้เราได้
- ทำ Box ให้ดี ให้สวยงาม กันน้ำ ติด Solar Cells เอาไปใช้งานจริงกันครับ ..

สำหรับท่านใด ที่มีข้อสงสัย หรือไม่เข้าใจตรงส่วนไหน สามารถ Post ถามได้ที่บทความนี้ครับ
หรือ Add LINE ID: pornpasok เข้ามาสอบถามก็ได้ครับ ถ้าตอบได้ผมจะตอบให้นะครับ 🙂

ESP32 (NODE32 LITE) PM2.5+Temperature+Humidity Sensors Node

เนื่องในวัน ESP32 Day (03/02/2019) ผมเองไม่ได้ไปร่วมงานที่จัดกัน เพราะติดงานอื่น และได้ sensors วัด PM2.5 มาพอดี ก็เลยมาทำ Sensers Node เพื่อวัดค่า PM2.5 ในบริเวณที่อยู่อาศัย แล้วส่งขึ้น thingspeak.com และ netpie.io freeboard เพื่อทำ Dashboard สวยๆ งามๆ และเป็นประโยชน์ในการรายงานค่า PM2.5 ที่มีปัญหากันอยู่ในประเทศไทย ตอนนี้ ให้เพื่อนๆ พี่ๆ น้องๆ ได้รับทราบกันครับ …

1. อุปกรณ์ และ stack ที่ใช้มีดังนี้

ESP32 (NODE32 LITE) 275 บาท [https://gravitechthai.com/product_detail.php?d=3318]
SHARP GP2Y1010AU0F (PM2.5 Sensor) 137 บาท [https://shopee.co.th/product/59553004/1361931900]
AM2302 (Temperature+Humidity Sensor) 180 บาท [https://www.myarduino.net/product/725/]
thingspeak.com
netpie.io

รวมราคา อุปกรณ์ ที่ใช้ ประมาณ 600 บาท ครับ 🙂

2. รายละเอียด ของ SHARP GP2Y1010AU0F Sensor

สำหรับรายละเอียด ของแต่ละ PIN ของ SHARP GP2Y1010AU0F เป็นดังนี้ครับ
โดยจะต้องมี C 220 uF และ R 150 ohm ต่อด้วย (ตัวที่ผมซื้อมา พี่จีน ลืมแถมมาให้ +__+)


Sensor ที่ผมได้มา จะแถมสาย เรียงสีมาแบบนี้เลยครับ แต่มีบาง version จะเป็นสีเรียงต่างจากนี้ ไม่ต้องตกใจครับ ..


PIN ต่างๆ มีดังนี้ INPUT จะมี LED PIN (Digital PIN) กับ Vo PIN (Analog PIN)


รายละเอียดการต่อขาต่างๆ ในที่นี้เทียบกับ Arduino ถ้าเป็น ESP32 ก็คล้ายๆ กันครับ

3. PIN ต่างๆ ที่ใช้งานกับ ESP32 (NODE32 LITE)

สำหรับในการต่อใช้งาน กับ ESP32 (NODE32 LITE) ผมจะใช้ PIN ต่างๆ ประมาณนี้
PIN 13 กับขา INPUT ของ AM2302 (Temperature+Humidity Sensor)
PIN 16 กับขา LED ของ SHARP GP2Y1010AU0F (PM2.5 Sensor)
PIN 36 (Analog INPUT) กับขา Vo ของ SHARP GP2Y1010AU0F (PM2.5 Sensor)


การเชื่อมต่อ Node32 Lite + Sharp GP2Y1010AU0F และ AM2302


ในรูป ยังไม่ได้ต่อ AM2302 (Temperature+Humidity Sensor) แต่คิดว่าเพื่อนๆ น่าจะเคยใช้งานกันมาแล้ว

ใน Arduino IDE เราจะต้องทำการเพิ่ม PMSensor Library เข้าไปด้วยนะครับ

4. Source Code

สำหรับ Code ผมเขียนเป็น Deep Sleep Mode ทุกๆ 1 นาที ประมาณนี้ครับ ..
ถามว่าทำไมต้อง Deep Sleep Mode?
คำตอบคือ เพื่อประหยัด battery เวลาใช้งานจริงครับ และอุปกรณ์พวกนี้ ถ้าให้ connect WiFi ตลอดเวลา จะเกิดความร้อนสูงมาก ทำให้ ประสิทธิภาพในการทำงาน ลดลง หรือทำงานผิดพลาดได้ง่าย ครับ ..

/* Connect to SHARP PM2.5 Sensor*/
#include <PMsensor.h>
PMsensor PM;
#include <WiFi.h>
#include "DHT.h"
#define DHTPIN 13   // NodeMCU PIN D1
#define DHTTYPE DHT22   // DHT 22  (AM2302), AM2321
//#define DHTTYPE DHT21   // DHT 21 (AM2301)
DHT dht(DHTPIN, DHTTYPE);

// AP 
const char* ssid     = "SookYenFarm";    // SSID Wifi
const char* password = "********";   // Password Wifi

// HTTP API 
const char* host = "api.thingspeak.com";
const char* api   = "********";  //API Key

int value = 0;
void connect() {
  // We start by connecting to a WiFi network
  Serial.println();
  Serial.println();
  Serial.print("Connecting to ");
  Serial.println(ssid);
  WiFi.begin(ssid, password);
  while (WiFi.status() != WL_CONNECTED) {
    delay(500);
    Serial.print(".");
  }
  Serial.println("");
  Serial.println("WiFi connected");  
  Serial.println("IP address: ");
  Serial.println(WiFi.localIP());
  Serial.println("DHT22 test!");
  
  dht.begin();

  // LED Stop
  //digitalWrite(LED_BUILTIN, HIGH);
  //delay(10);
  //delay(60000);
  ++value;
  float h = dht.readHumidity();
  float t = dht.readTemperature();
  float f = dht.readTemperature(true);
  if (isnan(h) || isnan(t) || isnan(f)) {
    Serial.println("Failed to read from DHT sensor!");
    return;
  }
  float hif = dht.computeHeatIndex(f, h);
  float hic = dht.computeHeatIndex(t, h, false);
  Serial.print("Humidity: ");
  Serial.print(h);
  Serial.print(" %\t");
  Serial.print("Temperature: ");
  Serial.print(t);
  Serial.print(" *C ");
  Serial.print(f);
  Serial.print(" *F\t");
  Serial.print("Heat index: ");
  Serial.print(hic);
  Serial.print(" *C ");
  Serial.print(hif);
  Serial.println(" *F");
  Serial.print("connecting to ");
  Serial.println(host);

  float pm = 0;
  int err = PMsensorErrSuccess;
  
  if ((err = PM.read(&pm, true, 0.1)) != PMsensorErrSuccess) {
    Serial.print("data Error = ");
    Serial.println(err);
    return;
  }
  Serial.print("PM2.5: ");
  Serial.print(pm);
  Serial.println(" ppm");

  // Use WiFiClient class to create TCP connections
  WiFiClient client;
  const int httpPort = 80;
  if (!client.connect(host, httpPort)) {
    Serial.println("connection failed");
    return;
  }

  // We now create a URI for the request
  String url = "/update?api_key=";
  url += api;
  url += "&field1=";
  url += t;
  url += "&field2=";  
  url += h;
  url += "&field3=";  
  url += pm;
  // https://api.thingspeak.com/update?api_key=xxxxxxxxxx&field1=t&field2=h&field3=pm
  Serial.print("Requesting URL: ");
  Serial.println(url);
  // This will send the request to the server
  client.print(String("GET ") + url + " HTTP/1.1\r\n" +
               "Host: " + host + "\r\n" + 
               "Connection: close\r\n\r\n");
   //Wait up to 10 seconds for server to respond then read response
   int i=0;
   while((!client.available()) && (i<1000)){
     // LED Blink
     digitalWrite(LED_BUILTIN, LOW);
     delay(10);
     //Serial.println(i);
     i++;
   }
   while(client.available()){
     String line = client.readStringUntil('\r');
     Serial.print(line);
   }
   Serial.println();
   Serial.println("closing connection");
}
void setup() {
  Serial.begin(115200);
  Serial.setTimeout(2000);
  delay(1000);
  pinMode(LED_BUILTIN, OUTPUT);
  /////(infrared LED pin, sensor pin)  /////
  PM.init(16, 36);

  // Wait for serial to initialize.
  while (!Serial) { }

  Serial.println("Device Started");
  Serial.println("-------------------------------------");
  Serial.println("Running Deep Sleep Firmware!");
  Serial.println("-------------------------------------");

  connect();

  Serial.println("Sleeping 60 seconds ..");
  // Deep Sleep 60 seconds
  ESP.deepSleep(58e6); // 60e6 is 60 microsecondsESP.
  //ESP.deepSleep(298e6); // 5*60 microsecondsESP.
}

Source Code ใน GitHub ตามนี้เลยครับ ESP32 PM2.5 sensor

5. Data ที่ Feed ขึ้น ThingSpeak

https://thingspeak.com/channels/91414

6. Dashboard ที่ feed จาก ThingSpeak ขึ้น netpie.io Freeboard

Next Step …

– ทำ Shield สำเร็จรูป SHARP GP2Y1010AU0F + AM2302 สำหรับ ESP32 (NODE32 LITE)
– ทำ Box กันน้ำ เพื่อให้สามารถนำไปติดตั้งตามจุดต่างๆ ได้สะดวกขึ้น
– ใช้แผง Solar Cells มาใช้งานกับ Battery 18650
– รายงาน รายละเอียด ผ่าน LINE Bot
– สั่งปั้มพ่นหมอกทำงาน เมื่อค่า PM2.5 เกินกำหนด 🙂

Reference Links
https://blog.netpie.io/archives/3028
https://www.instructables.com/id/How-to-Interface-With-Optical-Dust-Sensor/

ปล. สำหรับใครที่สนใจอยากทำบ้าง หรือสงสัยตรงไหน สามารถ post ถามได้ที่ blog นี้ได้เลยครับ 🙂

LINE Bot + node.js + MQTT + ESP32 (IoT) เปิด/ปิด ไฟ (ตอนที่ 1)

สวัสดีครับ เพื่อนๆ ทุกท่าน ผมเอง ไม่ได้ มา update blog เป็นเวลานานเหมือนกัน เผลอๆ แป๊บๆ ก็จะสิ้นปีอีกแล้ว ..

ปีนี้ ที่ผ่านมาผมได้มีโอกาสกลับไปอยู่บ้าน ที่จันทบุรี ได้ลงไปสัมผัส ไปเป็นเกษตรกรจริงๆ ด้วยตัวเอง ทำให้ได้รับประสบการณ์ ที่ดีมาก ได้รู้ว่าจริงๆ แล้ว เกษตรกร (ชาวสวน) เค้าต้องการอะไร เค้าขาดอะไร และทำอย่างไร จะทำให้ การทำงานมีประสิทธิภาพมากขึ้น มีเวลาพักผ่อนอยู่กับครอบครัวมากขึ้น มีความสุขมากขึ้น รายได้เพิ่มขึ้น และค่าใช้จ่ายลดลง ..

จึงเกิดเป็น Project นี้ขึ้นมา คือระบบเปิด/ปิด มอเตอร์สูบน้ำ ผ่าน LINE Bot หรือ LINE Messaging API นั่นเอง ที่ผมเลือกใช้ Chat Bot มาเป็นระบบสั่งเปิด/ปิด เพราะว่า เป็นการง่ายสำหรับเกษตรกร เพราะปกติเค้าใช้ LINE ผ่านมือถือกันอยู่แล้ว จะได้ไม่ต้องวุ่นวาย ลง App ใหม่ๆ หรือเรียนรู้ App ใหม่ๆ เพราะแค่พิมพ์ เปิด/ปิด มอเตอร์สูบน้ำ ที่อยู่ ที่สระน้ำสาธารณะ ของหมู่บ้าน หรือตามริมคลอง ริมแม่น้ำ ก็จะทำงานตามคำสั่งทันที ..

Stack ที่ผมใช้ ใน Project นี้ จะเป็น Open Source ทั้งหมด และมีให้เราใช้ฟรีๆ กันอยู่แล้ว ส่วนตัว H/W (IoT device)  ตอนแรก ผมสนใจ NB-IoT, LoRa เหมือนกัน เพราะตาม concept มันเหมาะมาก ในเรื่องของการรับส่งระยะไกล และประหยัดพลังงาน แต่ติดอยู่ที่ว่า ราคาของ H/W ยังสูง และเครือข่าย ยังไม่ครอบคลุมทั่วถึง ก็เลยกลับไปคิดถึง IoT device ที่เป็น WiFi 2.4GHz ทั่วๆ ไป ที่ราคาตอนนี้ ไม่แพง ประมาณ 100-150 บาท/บอร์ด เช่นพวกที่ใช้ chip ESP8266, ESP32 แทน และบริเวณที่ไปใช้งาน ไฟฟ้าเข้าถึงแล้ว จึงไม่ต้องห่วงเรื่องของพลังงานไฟฟ้า เท่าไรนัก แต่ถ้าเป็นไปได้ ก็จะทำให้อยู่ใน deep sleep mode เพราะจะทำให้ประหยัดพลังงานและ เกิดความร้อน น้อยกว่า mode ปกติ ..

Stack ต่างๆ สรุป มีดังต่อไปนี้ 
– LINE Messaging API (LINE Bot)
– node.js (Heroku)
– MQTT (Heroku)
– ESP32 (IoT device) + WiFiManager

อ่านต่อตอนที่ 2 (ตอนจบ) ได้ที่นี่ครับ http://ton.packetlove.com/blog/iot/line-bot-node-js-mqtt-esp32-iot-2.html

Add LINE มาลองเล่น กับ tonofarmbot กันดูได้ครับ