How to Install Magento 2.4.6 on Ubuntu 22.04

Magento
Install Diagram

สวัสดีครับ วันนี้ จะมาพูดถึงการ Install Magento 2 (Adobe Commerce) นะครับ
เป็น eCommerce Software ตัวนึง ที่น่าใช้มากๆ มาพร้อมกับ feature ที่ครบครัน ..

รายละเอียดเพิ่มเติม https://business.adobe.com/products/magento/magento-commerce.html

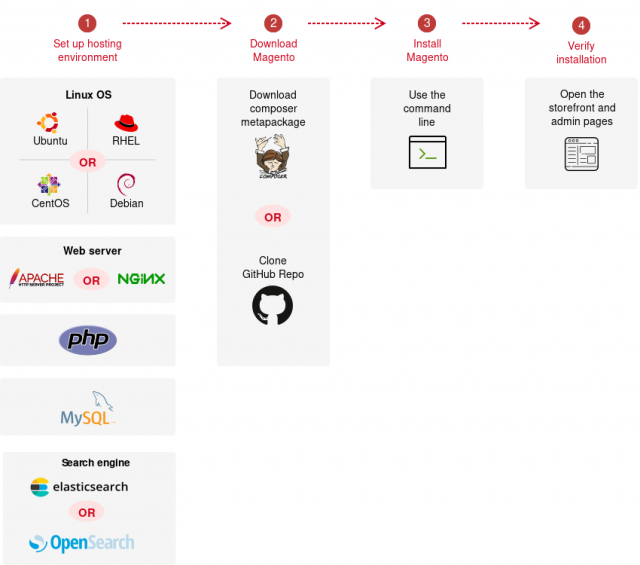
รายละเอียดของ System ประมาณนี้ครับ

- OS: Ubuntu 22.04
- Magento: 2.4.6-p2 (Open Source)
- Apache: 2.4.x
- PHP: 8.1.2
- Composer: 2.2.6
- MySQL: 8.0.34
- Elasticsearch: 7.17.13

มาเริ่มกันเลย ..

Step 1: Update Operating System

# apt update && apt upgrade -y

Step 2: Install Apache Web Server

# apt install apache2

Step 3: Install PHP and PHP extensions

# apt install php php-common libapache2-mod-php php-cli php-fpm php-mysql php-json php-opcache php-gmp php-curl php-intl php-mbstring php-xmlrpc php-gd php-xml php-zip php-soap php-bcmath php-apcu

Modify php.ini file (/etc/php/8.1/cli/php.ini)

memory_limit = 1GB
upload_max_filesize = 256M
zlib.output_compression = On
max_execution_time = 600
max_input_time = 900
date.timezone = Asia/Bangkok

Step 4: Install the MySQL server

# apt install mysql-server
# mysql_secure_installation

Step 5: Create a Magento Database

# mysql -u root -p
mysql> CREATE DATABASE magento;
mysql> CREATE USER 'magento'@'localhost' IDENTIFIED BY 'Str0ngPa$$w0rd';
mysql> GRANT ALL PRIVILEGES ON magento.* TO 'magento'@'localhost';
mysql> FLUSH PRIVILEGES;
mysql> EXIT;

Step 6. Install Elasticsearch

# curl -fsSL https://artifacts.elastic.co/GPG-KEY-elasticsearch | sudo apt-key add -
# echo "deb https://artifacts.elastic.co/packages/7.x/apt stable main" | sudo tee -a /etc/apt/sources.list.d/elastic-7.x.list

# apt update && apt install elasticsearch

# systemctl start elasticsearch
# systemctl enable elasticsearch

Verify Elasticsearch

curl -X GET "localhost:9200"

{
"name" : "magento-01",
"cluster_name" : "elasticsearch",
"cluster_uuid" : "-Or5raP6T5uEG3bUG1JYHw",
"version" : {
"number" : "7.17.13",
"build_flavor" : "default",
"build_type" : "deb",
"build_hash" : "2b211dbb8bfdecaf7f5b44d356bdfe54b1050c13",
"build_date" : "2023-08-31T17:33:19.958690787Z",
"build_snapshot" : false,
"lucene_version" : "8.11.1",
"minimum_wire_compatibility_version" : "6.8.0",
"minimum_index_compatibility_version" : "6.0.0-beta1"
},
"tagline" : "You Know, for Search"
}

Step 7: Install Composer

# apt install composer

Step 8: Install Magento

Goto Magento Marketplace https://marketplace.magento.com/

Get Access Keys
My profile > Marketplace > My products > Access Keys

# composer global config http-basic.repo.magento.com Your-Public-Key Your-Private-Key

# composer create-project --repository-url=https://repo.magento.com/ magento/project-community-edition=2.4.6-p2 /var/www/magento
# cd /var/www/magento

# bin/magento setup:install \
--base-url=http://your-domain.com \
--db-host=localhost \
--db-name=magento \
--db-user=magento \
--db-password=Str0ngPa$$w0rd \
--admin-firstname=Admin \
--admin-lastname=User \
--admin-email=admin@your-domain.com \
--admin-user=admin \
--admin-password=admin123 \
--language=en_US \
--currency=USD \
--timezone=Asia/Bangkok \
--use-rewrites=1

# chown -R www-data: /var/www/magento

Step 9: Setup Cron jobs

# sudo -u www-data bin/magento cron:install

Step 10: Configure Apache for Magento

Create /etc/apache2/sites-available/magento.conf

<VirtualHost *:80>
ServerAdmin admin@your_domain.com
DocumentRoot /var/www/magento/pub
ServerName your_domain.com
ServerAlias www.your_domain.com

<Directory /var/www/magento>
AllowOverride All
</Directory>

ErrorLog ${APACHE_LOG_DIR}/error.log
CustomLog ${APACHE_LOG_DIR}/access.log combined
</VirtualHost>
# a2ensite magento.conf
# a2enmod rewrite

# systemctl restart apache2

Step 11: Access your Magento installation

Store Front: http://your_domain.com
Admin Dashboard: http://your_domain.com/admin_xxxxxx

Step 12: Diasable 2FA

# bin/magento mod:dis Magento_AdminAdobeImsTwoFactorAuth Magento_TwoFactorAuth
# bin/magento setup:di:compile

Options: Tuning Magento

https://experienceleague.adobe.com/docs/commerce-operations/performance-best-practices/software.html

Filebeat Lightweight shipper for logs from k8s to Elasticsearch

Beat

สวัสดีครับ DevOps 101 ของเรา วันนี้ จะมาพูดถึง Filebeat นะครับ ..

Filebeat คืออะไร?
Filebeat = Lightweight shipper for logs
“Whether you’re collecting from security devices, cloud, containers, hosts, or OT, Filebeat helps you keep the simple things simple by offering a lightweight way to forward and centralize logs and files.”

ถ้าเอาแบบเข้าใจง่ายๆ ก็คือ ตัวกวาด logs จากที่ต่างๆ เข้ามาที่ centralize logs ในที่นี้ ผมจะพูดถึง k8s cluster (EKS) logs ไปเก็บที่ Elasticsearch ละกันนะครับ ..

จริงๆ ยังมี ตัวอื่นๆ อีก นะครับ ที่ทำงานคล้ายๆ Filebeat เช่น Fluentd, Fluentbit

ในเมื่อเราใช้ ELK Stack ใน Ecosystem ของเราแล้ว การที่เราอยาก search logs ต่างๆ ที่เกิดจาก container ของเรา ได้ง่ายสุด ก็คือการ ship logs จาก k8s cluster ของเรา ไปเก็บไว้บน Elasticsearch แล้วทำการ search ผ่าน Kibana ..

วิธีการ Install Filebeat ใน k8s cluster

ทำได้หลายวิธีครับ ในที่นี้ ผมจะใช้วิธีง่ายๆ ผ่าน kubectl ดังต่อไปนี้

1. Create Secret โดยใส่ค่าที่จำเป็น พวกนี้ลงไป

ELASTICSEARCH_HOST = Endpoint ของ Elasticsearch เรา
ELASTICSEARCH_PORT = Port ที่ Elasticsearch เราทำงานอยู่
ELASTICSEARCH_USERNAME = Username ของ Elasticsearch
ELASTICSEARCH_PASSWORD = Password ของ Elasticsearch
ELASTIC_CLOUD_ID = Cloud ID ในกรณีที่เราใช้ผ่าน Cloud Service ของ Elastic.co
ELASTIC_CLOUD_AUTH = Username:Password ของ Elasticsearch

filebeat-secret.yaml

apiVersion: v1
kind: Secret
metadata:
  name: filebeat
  namespace: kube-system
type: Opaque
data:
  ELASTICSEARCH_HOST: aHR0cDovL2xvY2FsaG9zdA==
  ELASTICSEARCH_PASSWORD: 
  ELASTICSEARCH_PORT: OTIwMA==
  ELASTICSEARCH_USERNAME: 
  ELASTIC_CLOUD_AUTH: 
  ELASTIC_CLOUD_ID: 

จากนั้น สั่ง create secret

kubectl create -f filebeat-secret.yaml

2. Create Deployment และ Resource อื่นๆ

filebeat-kubernetes.yaml

---
apiVersion: v1
kind: ConfigMap
metadata:
  name: filebeat-config
  namespace: kube-system
  labels:
    k8s-app: filebeat
data:
  filebeat.yml: |-
    # To enable hints based autodiscover, remove `filebeat.inputs` configuration and uncomment this:
    filebeat.autodiscover:
      providers:
       - type: kubernetes
         node: ${NODE_NAME}
         hints.enabled: true
         hints.default_config:
           type: container
           paths:
             - /var/log/containers/*${data.kubernetes.container.id}.log

    # Filter by container.name
    # filebeat.autodiscover:
    #   providers:
    #     - type: kubernetes
    #       node: ${NODE_NAME}
    #       templates:
    #         - condition:
    #             contains:
    #               kubernetes.container.name: "container01"
    #           config:
    #             - type: container
    #               paths:
    #                 - "/var/log/containers/*-${data.kubernetes.container.id}.log"
    #         - condition:
    #             contains:
    #               kubernetes.container.name: "container02"
    #           config:
    #             - type: container
    #               paths:
    #                 - "/var/log/containers/*-${data.kubernetes.container.id}.log"

    processors:
      - add_cloud_metadata:
      - add_host_metadata:

    cloud.id: ${ELASTIC_CLOUD_ID}
    cloud.auth: ${ELASTIC_CLOUD_AUTH}

    output.elasticsearch:
      hosts: ['${ELASTICSEARCH_HOST:elasticsearch}:${ELASTICSEARCH_PORT:9200}']
      #index: "%{[fields.my_type]}-%{[agent.version]}-%{+yyyy.MM.dd}" 
      username: ${ELASTICSEARCH_USERNAME}
      password: ${ELASTICSEARCH_PASSWORD}
---
apiVersion: apps/v1
kind: DaemonSet
metadata:
  name: filebeat
  namespace: kube-system
  labels:
    k8s-app: filebeat
spec:
  selector:
    matchLabels:
      k8s-app: filebeat
  template:
    metadata:
      labels:
        k8s-app: filebeat
    spec:
      serviceAccountName: filebeat
      terminationGracePeriodSeconds: 30
      hostNetwork: true
      dnsPolicy: ClusterFirstWithHostNet
      containers:
        - name: filebeat
          image: docker.elastic.co/beats/filebeat:8.6.2
          args: ["-c", "/etc/filebeat.yml", "-e"]
          env:
            - name: ELASTICSEARCH_HOST
              valueFrom:
                secretKeyRef:
                  name: filebeat
                  key: ELASTICSEARCH_HOST
            - name: ELASTICSEARCH_PORT
              valueFrom:
                secretKeyRef:
                  name: filebeat
                  key: ELASTICSEARCH_PORT
            - name: ELASTICSEARCH_USERNAME
              valueFrom:
                secretKeyRef:
                  name: filebeat
                  key: ELASTICSEARCH_USERNAME
            - name: ELASTICSEARCH_PASSWORD
              valueFrom:
                secretKeyRef:
                  name: filebeat
                  key: ELASTICSEARCH_PASSWORD
            - name: ELASTIC_CLOUD_ID
              valueFrom:
                secretKeyRef:
                  name: filebeat
                  key: ELASTIC_CLOUD_ID
            - name: ELASTIC_CLOUD_AUTH
              valueFrom:
                secretKeyRef:
                  name: filebeat
                  key: ELASTIC_CLOUD_AUTH
            - name: NODE_NAME
              valueFrom:
                fieldRef:
                  fieldPath: spec.nodeName
          securityContext:
            runAsUser: 0
            # If using Red Hat OpenShift uncomment this:
            #privileged: true
          resources:
            limits:
              memory: 200Mi
            requests:
              cpu: 100m
              memory: 100Mi
          volumeMounts:
            - name: config
              mountPath: /etc/filebeat.yml
              readOnly: true
              subPath: filebeat.yml
            - name: data
              mountPath: /usr/share/filebeat/data
            - name: varlibdockercontainers
              mountPath: /var/lib/docker/containers
              readOnly: true
            - name: varlog
              mountPath: /var/log
              readOnly: true
      volumes:
        - name: config
          configMap:
            defaultMode: 0640
            name: filebeat-config
        - name: varlibdockercontainers
          hostPath:
            path: /var/lib/docker/containers
        - name: varlog
          hostPath:
            path: /var/log
        # data folder stores a registry of read status for all files, so we don't send everything again on a Filebeat pod restart
        - name: data
          hostPath:
            # When filebeat runs as non-root user, this directory needs to be writable by group (g+w).
            path: /var/lib/filebeat-data
            type: DirectoryOrCreate
---
apiVersion: rbac.authorization.k8s.io/v1
kind: ClusterRoleBinding
metadata:
  name: filebeat
subjects:
  - kind: ServiceAccount
    name: filebeat
    namespace: kube-system
roleRef:
  kind: ClusterRole
  name: filebeat
  apiGroup: rbac.authorization.k8s.io
---
apiVersion: rbac.authorization.k8s.io/v1
kind: RoleBinding
metadata:
  name: filebeat
  namespace: kube-system
subjects:
  - kind: ServiceAccount
    name: filebeat
    namespace: kube-system
roleRef:
  kind: Role
  name: filebeat
  apiGroup: rbac.authorization.k8s.io
---
apiVersion: rbac.authorization.k8s.io/v1
kind: RoleBinding
metadata:
  name: filebeat-kubeadm-config
  namespace: kube-system
subjects:
  - kind: ServiceAccount
    name: filebeat
    namespace: kube-system
roleRef:
  kind: Role
  name: filebeat-kubeadm-config
  apiGroup: rbac.authorization.k8s.io
---
apiVersion: rbac.authorization.k8s.io/v1
kind: ClusterRole
metadata:
  name: filebeat
  labels:
    k8s-app: filebeat
rules:
  - apiGroups: [""] # "" indicates the core API group
    resources:
      - namespaces
      - pods
      - nodes
    verbs:
      - get
      - watch
      - list
  - apiGroups: ["apps"]
    resources:
      - replicasets
    verbs: ["get", "list", "watch"]
  - apiGroups: ["batch"]
    resources:
      - jobs
    verbs: ["get", "list", "watch"]
---
apiVersion: rbac.authorization.k8s.io/v1
kind: Role
metadata:
  name: filebeat
  # should be the namespace where filebeat is running
  namespace: kube-system
  labels:
    k8s-app: filebeat
rules:
  - apiGroups:
      - coordination.k8s.io
    resources:
      - leases
    verbs: ["get", "create", "update"]
---
apiVersion: rbac.authorization.k8s.io/v1
kind: Role
metadata:
  name: filebeat-kubeadm-config
  namespace: kube-system
  labels:
    k8s-app: filebeat
rules:
  - apiGroups: [""]
    resources:
      - configmaps
    resourceNames:
      - kubeadm-config
    verbs: ["get"]
---
apiVersion: v1
kind: ServiceAccount
metadata:
  name: filebeat
  namespace: kube-system
  labels:
    k8s-app: filebeat
---
 

จากนั้น สั่ง create deployment

kubectl create -f filebeat-kubernetes.yaml

3. Search k8s cluster logs ผ่าน Kibana

ถ้า config ทุกอย่างเราถูกต้อง container ทำงานได้ เราก็จะได้ logs ของ k8s cluster เรา ไปเก็บบน Elasticsearch และทำการ search ผ่าน Kibana ได้เลย

Kibana Search

* เราสามารถ filter input ของ Logs ที่จะ ship ไปเก็บ ที่ Elasticsearch ได้

ตัวอย่างอยู่ใน filebeat-kubernetes.yaml ที่ comment ไว้

เป็นอย่างไรกันบ้างครับ ไม่ยากเลยใช่ไหมครับ สำหรับการ ship logs จาก k8s cluster ของเรา ไปเก็บบน Elasticsearch 🙂

Git Repo: https://github.com/pornpasok/k8s-logs-es-filebeat
Ref: https://www.elastic.co/beats/filebeat